Payroll-Input-Labour.html
Inputting Payroll - Labour Distribution
PURPOSE:
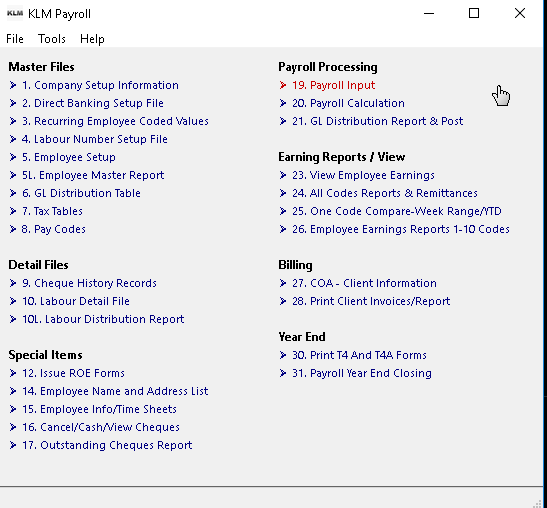
This program is the first step required to issue pay cheques. It is the first option under "Payroll Processing"
One or more input records are created for each employee to be paid.
This program can also be used to enter adjustments specific to each employee, like a manual cheque or catch up values if starting up with the KLM Payroll system half way through the year. These also must be processed through the PAYROLL CALCULATION MENU in order to get them into the history file so they become part of the Employee's T4 history.
KEEP IN MIND
The Payroll Input File is based on the Company Number entered on the main screen. This does not stop you from entering employees from one company into another companies input file or from splitting up a cheque run for the same company by using another company's input file. Although the appropriate company information for the file will be used in the pay cheque run in Payroll Calculation the history records will go to the company specified on the employee's master record not the run/input Company number.
The following files are used by this program;
- COMPANY MASTER record
- EMPLOYEE MASTER record
- PAY CODE records.
More than one batch of pay input records can be processed for the same pay period. Once ALL processing is completed, this file is deleted. Defaults are provided for the COMPANY, WEEK NUMBER and TOTAL WEEKS WORKED fields.
ADDING A NEW PAY INPUT RECORD
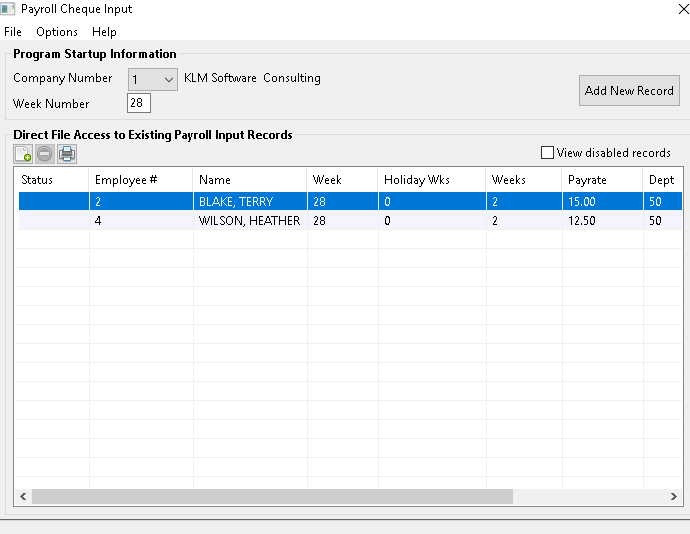
Payroll Input is done using two forms. On the first form select both the COMPANY Number and the WEEK Number before entering Records. Remember you can have multiple input data files (based upon the Company Number).
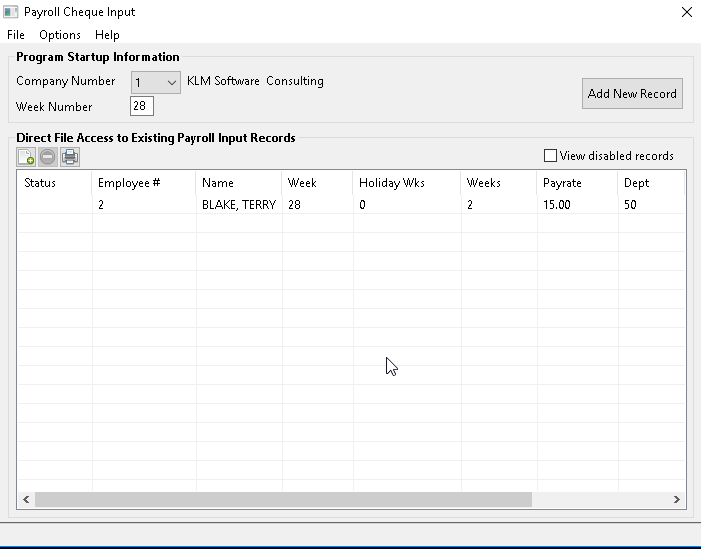
If any data records already exist for the company in question, they will be displayed on the current screen. If no records exist, that part of the screen will be blank.
To add a NEW record click once on the ADD NEW RECORD button. A new blank data input record (screen) will appear.
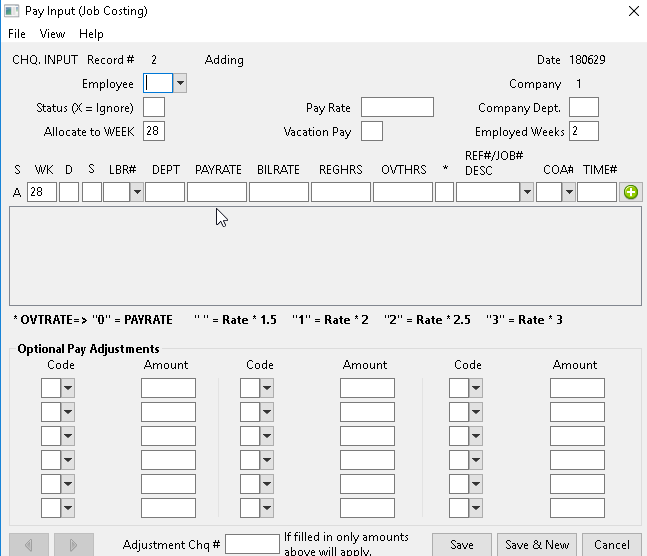
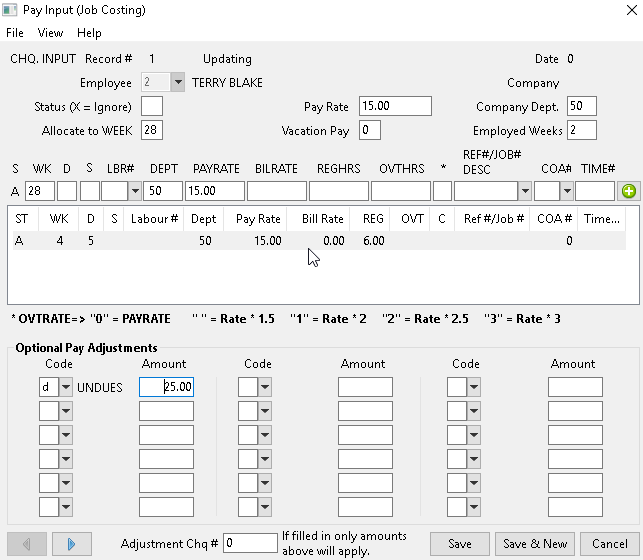
This screen is divided into 3 sections:
- Main Information (top 3rd of screen) will contain items such who is to be paid and when.
- Labour Detail Lines (middle of screen) will contain all hours and wages for hourly employees.
- Pay Adjustments section (bottom 3rd of screen) which services as a way to make adjustments or add additional items. See ALTERNATE Input for usage.
When the data entry is done for that employee Save the input record before continuing on to the next one.
SAVING the NEW record
There are two ways to SAVE a NEW record.
- Saving using the SAVE Button will save the current record then return you to the prior screen. The newly created record should be added to the input record list.
- Saving using the SAVE & NEW Button will SAVE the current record before displaying a new BLANK Pay Input record screen.
MODIFY * EXISTING * CHEQUE INPUT RECORD
Follow the steps below to MODIFY the existing Pay Input
information.
1) From the first input Screen, select the COMPANY and Week (if multiple files exist).
- The displayed records can be sorted by clicking ONCE on the list "headings". For example Click on the EMPLOYEE # to get a list in Employee Number order.
- To select any record DOUBLE Click on it and the corresponding data input record will be displayed.
2) Make ALL necessary changes to the appropriate fields. If in doubt as to a field's contents, see FIELD Definitions section for further information.
- While changes can be made to some fields such as Employed Weeks, some fields can not be changed. You can alter (other than delete) the labour detail records.
- To change a detail line delete the original labour detail line, then re-enter it.
- Use the LEFT/RIGHT Arrow Buttons to go forward or backward through the data input records (one record at a time).
3) Be sure to save the modified record using either the SAVE or SAVE/NEW button.
PRINTING CHEQUE INPUT RECORDS
Follow the steps below to PRINT a listing of all Pay Input records. KLM recommends reviewing this list before processing payroll as it is easier to fix problems before processing the actual payroll (produced pay cheques).
1) From the first input screen verify the Company and Week numbers to make sure you have the correct file to print.
2) Select the OPTIONS Tab from the MENU Bar. Then Click once on PRINT PAYROLL INPUT LIST option. A Windows Print Preview screen will appear. Make your selections from the various printing options then print the report.
DELETE CHEQUE INPUT RECORDS OR ENTIRE FILE
To delete ONE cheque input record, do the following:
1) From the first input screen, select a valid COMPANY No. to to access the correct Pay Input file. Then select the employee record to DELETE by DOUBLE Clicking on it. The record in question will appear.

2) Alter the following field, in the Pay Input Record. Place an X in the STATUS field. While the record is NOT physically removed from the file, it will now be IGNORED during processing.
3) Save the modified record using the SAVE Button.
The labour detail lines (records) for each Pay Input record are stored in a separate file, as such, you can delete a detail line (record) associated with a particular employee's pay input record without deleting the entire record.
1) Call up the the employee record you wish to alter (see instructions above).
2) DOUBLE Click on the Labour Detail line you wish to delete. A EDIT screen will appear. All fields will be shaded BUT the STATUS field.
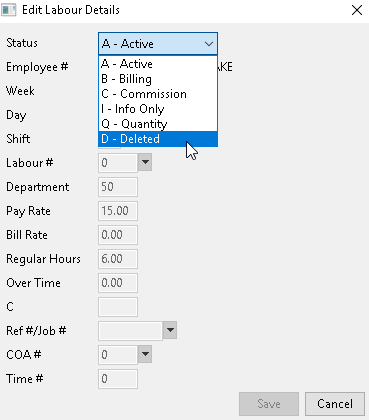
3) Change the STATUS to DELETED then SAVE the record. It will no longer show in the employee's pay input record.
4) Be sure to SAVE the changed input record using either the SAVE or SAVE/NEW Button.
To delete the ENTIRE Pay Input File, do the following:
1) From the First Input Screen, enter VALID Company and Week Numbers (if more than one file exists).
2) From the MENU Bar click on OPTIONS. From the Pull Down Menu, click on the DELETE INPUT FILE selection. You will be prompted ARE YOU SURE Click on **OK **if YES Or CANCEL if not sure.
3) Program removes present file, starts fresh file with a blank Pay Input Record. Proceed to input NEW records or EXIT the option.
FIELD DEFINITIONS - PAY INPUT RECORD
If you are unsure of what information to put into each of the fields of the Pay Input record, review the definitions listed below.
FIELD NAME |
DEFINITION |
CHQ.INPUT RECORD |
This is display only field, identifying the physical RECORD # position of this record within the cheque input file. |
DATE |
This is a display only field, identifying the actual date the record was entered (the computers system date is the default). |
EMPLOYEE NAME/NUMBER |
Enter a valid Employee Number corresponding to a Employee record number in the Employee Master File. The Employee Name and Pay Rate will display automatically. |
STATUS |
Record status MUST REMAIN BLANK or the employee's X=IGNORE input record will be ignored at time of processing (see Delete Input records for details). |
PAY RATE |
This field contains the PAY RATE setup in the Employee Master File. You can change the RATE for the current run. The Master record will NOT be affected. For SALARIED Employees, the PAY RATE represents ONE weeks wages. For HOURLY Employees, the PAY RATE represents the pay for ONE hour of work. |
COMP.DEPT. |
Optional: Enter a valid Department Number. If a Department Number exists in the Employee's Master record it will appear here. |
ALLOCATE TO WEEK |
The week number is automatically assigned by the TO WEEK program. This number indicates the WEEK ENDING DATE # for the Pay Period. |
VACATION PAY |
Optional: Leave this field BLANK, unless issuing vacation pay to this employee. For HOURLY Employees, place a 1 in this field. The employee will be paid for all vacation pay accrued. For SALARIED Employees, enter the physical number of weeks for which this employee is being paid vacation pay. As payment for vacation pay can very, see the ALTERNATE INPUT instructions for details. |
EMPLOYED WEEKS |
Enter the ACTUAL NUMBER of WEEKS an employee worked, including vacation weeks (if time taken). This value MUST be accurate, as it directly effects the dollar amounts for CPP/QPP, EIC, Income Tax and Salary Pay |
If employees are paid HOURLY record the number of hours worked (regular and/or OT) for each week. For SALARIED employees, leave these fields BLANK unless paying them for hours worked beyond the regular work week.
FIELD NAME |
DEFINITION |
S STATUS |
Is a display only field. The STATUS field is set by the Labour Number selected. The default STATUS will always be A. Remember, A status records will automatically be applied to the Regular and Overtime hours & wages when processing is done. |
WK WEEK |
Enter a valid week number (1 to 53) to indicate to which pay week this record is to be assigned. |
D Day |
One digit field representing the day of the week. Weeks are recorded as 7 consecutive days (i.e. 1 to 7). |
S SHIFT |
One digit field representing the shift an employee worked (on a per day/week basis). The SHIFT information in the Company Master will override the defaults for Pay and Bill Rates. |
LBR# |
Enter a valid Labour Number from LABOUR Number Setup File. Any elements unique to it's setup (i.e. STATUS) will override any field information already entered. |
DEPT# |
Enter a valid Department Number . Defaults can be assigned to a specific Employee or Labour No. |
PAYRATE |
This field will contain the pay-rate set up in the Employee Master. You can change the RATE for the current records. The PAY rate is for ONE hour of work and will be multiplied by the REGHRS to calculate a Regular Wage. Salary Employees; the RATE represents the WEEKLY SALARY divided by the Number of HOURS/WK. |
BILLRATE |
Optional. Used for customer billing and job costing to indicate the bill rate to be used against any hours defined on this labour line. |
REGHRS |
Enter the number of hours worked for a week, job etc. for which an employee will be paid the normal rate of pay. The REGHRS field is multiplied by the PAYRATE field to arrive at a regular wage. |
OVT HRS |
Enter the number of extra (overtime) hours worked for a week, job etc., for which the employee will be paid more than the normal rate of pay. The **OVTHRS **field is multiplied by the PAYRATE field to arrive at an overtime wage. The PAYRATE can be increased by use of the Overtime Class field. |
OVT Indicator |
This field indicates what rate of increase will be applied to the pay RATE field when it is multiplied by the OVERTIME HOURS to produce overtime pay. Valid entries are zero for a pay RATE multiplied by 1, blank for a pay RATE multiplied by 1.5, **one **for a pay RATE multiplied by 2, two for a pay RATE multiplied by 2.5, three for a pay RATE multiplied by 3. |
REF#/JOB# |
Free format for storing a job, reference number or description of what the employee did. This number can be printed on both pay stubs and customer invoices., |
COA# |
Optional. Enter a valid COA Number for the Customer, for whom the employee worked (see also Client Information & Print Client Invoices) |
TIME# |
Free format for storing miscellaneous information. |
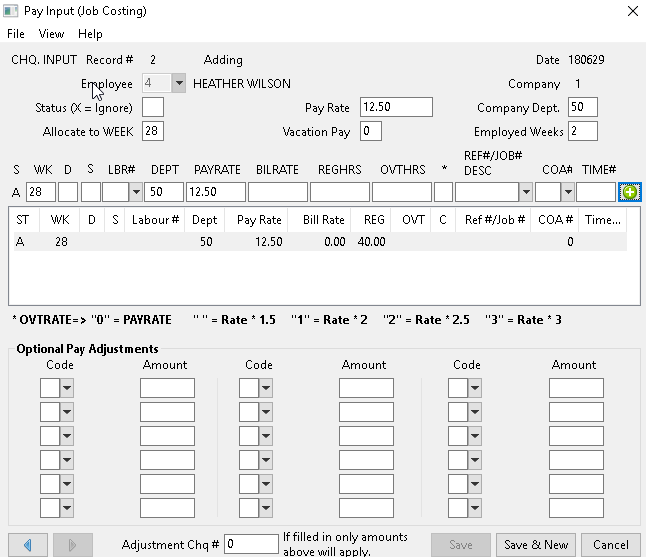
PLUS ICON. At the end of each detail input line, is a PLUS Button. This is used to SAVE the labour detail line. When the program SAVES a labour detail line, it also saves the Pay Input record, it is associated with.
Use the following fields to apply additional values to the employee cheque input record or record historical year-to-date earnings data, when cheques have already been issued for an employee. The remaining fields can be used in combination or separately. See the ALTERNATE INPUT section for further information.
Extra amounts may be applied to a pay during processing
of a record by entering the effected pay codes and dollar amounts in the CODE and AMOUNT fields. Eighteen items per input record may be added.
FIELD NAME |
DEFINITION |
ADJUSTMENT CHEQUE |
Optional: Leave BLANK, if you wish a cheque to be produced for this input record. Entries here cause the input record to be transferred as is to CHEQUE HISTORY FILE. |
CODE |
CODE entered in this field MUST be a valid pay code from the Pay Codes file. How the corresponding dollar amount is processed depends upon the code's function. |
AMOUNT |
Enter a dollar amount corresponding to the PAY CODE. The CODE type determines the effect the dollar amount will have upon the pay input record. If an opposite effect is desired, place a negative before the amount. |
SPECIAL FEATURES: OPTIONS MENU - 1st screen
In addition to PRINTING or DELETING the Payroll Input File, you have a number of additional utilities that can be used to speed up input of payroll records.
From the File List Screen, select the OPTIONS Tab on the MENU Bar. A list of all available utilities will appear. Click once to select any one of the options.
The available options are as follows:
- Print Pay Input List See PRINT CHEQUE INPUT RECORDS
Print a hard copy of the Pay Input Listing - Add All Active Salary Employees For This Company
Will automatically create a Cheque Input record for each active SALARIED Employees indicated by an "S" in the PAY TYPE field of their Master record. - Re-evaluate Link Labour Details Assigned To Cheque Input Record. If you have deleted labour detail lines or if labour detail lines appear to be missing when you print the file, this utility will fix the issue.
- Create Pay Input from Current Labour Details File
Will allow you to create the pay input file from the data records you entered in Labour Detail File. - Create Pay Input from Alternate Labour Input File
The same as the option above, only the labour detail file being accessed is different. - Delete Current Input File See DELETE CHEQUE INPUT FILE. Allows you to physically remove the cheque input file should you need to start fresh.
- Sort This Pay (Cheque) Input File By Employee, Department or COA Number. Allows you to sort the current input file by either EMPLOYEE NAME or DEPARTMENT NO. order.
Once each utility has complete it's action, such as created a new input file, you will be returned to this same screen. Perform another function or exit this menu option.
ALTERNATE INPUT
Not all pay input is straight forward, there are instances when you will have to perform special tasks. The following are the most common "special" situations encountered by our clients.
ISSUING VACATION PAY
The following applies to issuing of vacation pay for both salaried and hourly employees.
- You can issue ALL or PART of an employee's vacation pay.
- The vacation pay percentage can very according to the defaults in the Company and Employee Master Files. The default is 4% and includes all regular, overtime and holiday pay issued.
- The vacation pay accrual is automatically updated each time it is issued (for hourly employees) or is given. Accrual amounts are not stored for salaried employees.
- Vacation pay owing is stored under the PAY CODE v. Vacation pay issued is stored under the PAY CODE V.
- If including vacation pay on some cheque, the EMPLOYED WEEKS field MUST reflect the actual number of weeks worked, regardless of the amount issued.
- If no time is to be taken, it is recommended to place it on the same cheque as other earnings, so deductions are properly applied.
- Any vacation pay issued is subject to ALL standard government deductions (ie. CPP/UIC/TAX). These are to be taken at the time the vacation pay is issued.
There are different ways to record vacation pay and the method you use is up to you. Unless you have arranged with KLM Software to set up an alternate method, the following method will be in place.
- All hourly employees will have vacation pay automatically accrued each time a pay is issued.
- All salaried employees will be paid their regular wage for any vacation weeks taken.
See the sample screens below for how to record vacation pay for both Salaried and Hourly employees. These are just the most common examples. If unsure of what to enter, contact KLM Software first.
This entry will produce one week of vacation pay and two weeks regular wages for an salary employee paid bi-weekly.The vacation pay amount will be the value of one week's salary.

This entry will pay all vacation accrued plus the hourly employee's bi-weekly wage (based on their hours worked).

This entry will pay an hourly employee part of their vacation pay (if they want only $100 of the vacation pay owed them) along with their bi-weekly pay.
OTHER PAYROLL AMOUNTS
Occasionally extra amounts need to be added to a pay cheque, that are not automatically calculated.
- Taxable Benefits effect the GROSS wage upon which all government deductions are based. A Taxable benefit will increase the Gross but not the actual earnings, the employee will not receive extra money. Two pay codes have been set up to act as taxable benefits.
- **Lump sum **payments such as bonus or severance pay are not considered to be regular wages. Lump sums are be taxed on a straight percentage basis.
- Defaults for lump sum earnings (pay codes) are taxed at a flat rate (stored in field #24 of the Company Master File.
- Amounts for deductions such as: union dues, RRSP's, Group Insurance etc. can be entered as part of the cheque input or as a recurring entry. Certain amounts such as RRSP's will have a direct effect upon the amount of tax taken.
YTD AMOUNTS & ADJUSTMENT CHEQUES
When recording earnings for which NO cheque is to be issued, whether it is to update the Year-To-Date figures or record the issue of a manually calculated pay cheque, you must take the following into consideration.
Recording a Manual or Adjustment cheque:
- For manual cheques fill in the ADJUSTMENT CHQ# field with the cheque number used. If you don't know the number, enter 999. This prevents a cheque being issued.
- Enter ALL earnings, deductions and net amount of the cheque issued, in the CODE/AMOUNT fields. Earnings MUST include ALL Regular & Overtime pay. The Gross wage MUST be indicated as a separate amount.
- If Employment Insurance was deducted, enter Insurable Earnings as well as the amount deducted.
- Record the correct week number in the ALLOCATE TO WEEK field and the correct number of EMPLOYED WEEKS worked.
- To record an adjustment only the pay code and dollar amount of the adjustment is recorded in the CODE/AMOUNT fields. All other requirements are the same.
When recording Year-To-Date figures consider:
- Select the best method for transferring YTD figures; All payroll detail or only summary amounts.
- Before you begin be certain that the week number ALLOCATED TO WEEK refers to a specific WEEK.
- Be sure to enter ALL payroll information, as it was recorded and reported upon. Do not allow calculation of past payroll by another method.
Below is a typical "adjustment" cheque inputted to the system to record Year To Date Earnings.
