Payroll-Labour-Detail-File.html
LABOUR DETAIL FILE
PURPOSE:
This option is available only if the LABOUR DISTRIBUTION feature was purchased. This feature becomes a must if you require any of the following capabilities during the data entry of an employee's cheque record or tracking and reporting of your payroll information after cheques are issued.
- Multiple pay rates
- Multiple overtime rate assignments
- Multiple department assignments
- Billing information; bill rate, Customer references
- Customer Invoicing from labour input
- Job Costing information; Job(s) and customers worked on
- Assignment of hours and dollars to earnings other than regular and overtime pay (i.e. shift earnings)
- Up to 4 automatic calculations applied to a pay based on hours assigned to a labour category (i.e. Union fees).
- Week and day of week breakdown per pay
- Piecework input based on quantity of items at a rate per item
- Other optional tracking, reporting, detail categories
KEEP IN MIND
This menu option provides access to the detailed breakdowns of work known as Labour records created in this option or Payroll Input File or those contained in the historical files of Cheque History Records.
Customer Invoices can be produced from any one of the labour files. Only labour records with a bill rate and a Customer Number will be selected for invoicing (see PAYMENU #28).
Labour records can be setup to bill only (no pay rate) or pay the employee only (no bill rate) or do both if both the pay rate and bill rate are filled in.
Like Cheque History Records, Labour Detail file is closed off at the end of each calendar year. You can review Labour Detail Records for prior** years by changing the default DAT to a prior year. Only, the JOB (LABOUR) HISTORY Records file is renamed as part of the Year End Procedure PAY#31.
JOB / Labour Input Records can also be set up on a Company by Company basis (just as they are in PAY #19). You can therefor have more than one Labour INPUT File.
Three separate labour record files can be accessed by this menu option each with its own purpose, as follows;
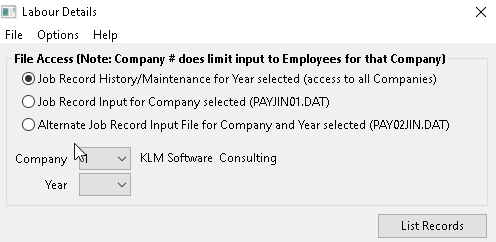
1) The JOB RECORD HISTORY file accesses labour records from PAYMENU #9. Cheque Historical labour records from all companies are stored in the same file per YEAR. The company number assigned to the employee of each labour record is used to identify the the records that belong to each company.
These labour records were used prior, during the calculation of a payroll cheque. IF YOU CHANGE THEM YOU CAN CAUSE PROBLEMS in the system. Keep the following items in mind if you wish to make changes to this file.
- NEVER change Employee number, Pay Rate, regular or overtime hours (or QTY if applicable).
- NEVER delete or add labour records that have a Pay rate.
- If you are using the Labour Number to have automatic calculation done, never change the labour number.
- If you change a Customer Number and you have the Customer billing feature active you must run the Complete Re-link process through PAYMENU #28 the next time you run this program.
2) The JOB RECORD INPUT file accesses LABOUR records attached to the current cheque input file in PAYMENU #19. Just like #19 there is one input file per existing master company.
If labour records are added using this option and if data records already exist in a Pay Input File, run the RE-LINK Re-Evaluate records utility in #19.
- If no data records have yet to be created in Pay Input, run the CREATING Cheque Input File utilities in #19.
3) The ALTERNATE JOB RECORD INPUT file accesses labour records that have been placed there in anticipation that segments (based on Year and Week) of these records will be drawn out into the Input labour file (see PAY #19 for details) for processing. For example; Courier delivery piecework that is billed out at a different time frame than the employees are paid.
ADDING NEW LABOUR DETAIL RECORDS
While it is recommended that you add new records using PAY #19 (Payroll Input), this software package allows you to add records using this option as an alternative to PAY #19 input options.
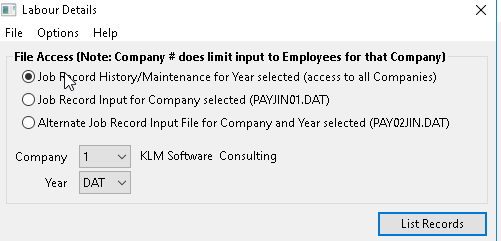
1) Select PAY #10 Labour Detail File. You are presented with a FILE options screen.

2) Choose the files accessed:
- Job Record History File (default setting). This file is the main “historical” data file and it is NOT recommended that you add records to this file.
- Job Record Input File (used in Pay #19). This is the main Payroll Input File for processing payroll. This file is deleted each time a payroll is processed (see PAY #20).
- Alternate Job Record Input File. This file is used if your payroll input data comes from another system (see Job Costing for details) or if you wish to keep the pay input data records, even after processing a payroll is done.
3) Then choose both the COMPANY Number and DATA Year to which you are adding records. Like the labour file, both Company and Year select will determine the actual file being used by the system. It is NOT recommended that you alter (add to) prior year’s data files.
4) Once you have done your file selection, click on LIST RECORDS button to advance to the next screen. If there are already data records in the file you have selected, they will be listed in the order in which they were entered.
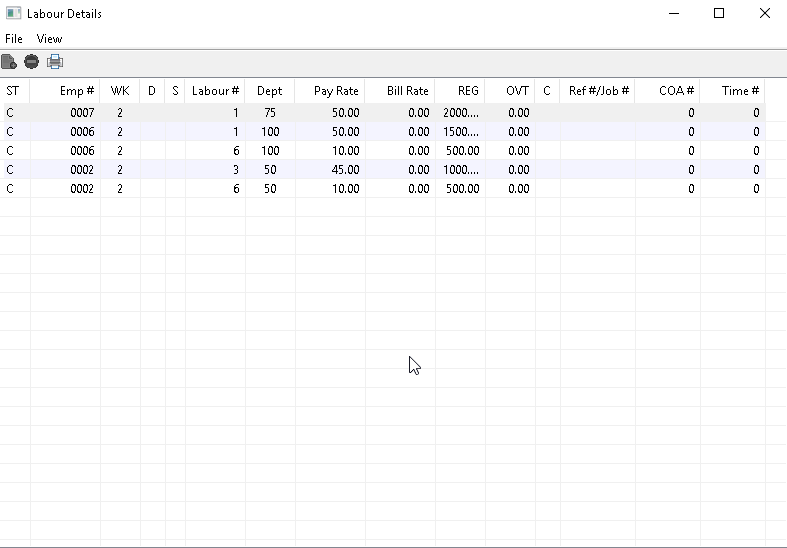
If the file is empty (no records exist), a blank screen will be displayed.
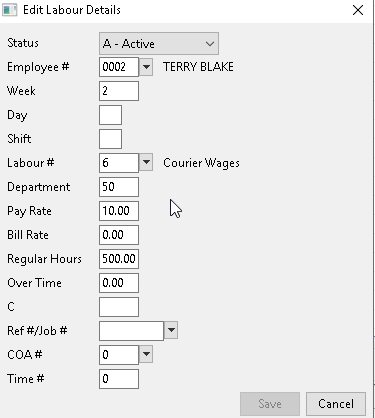
5) To ADD a new record, select FILE then select NEW. A blank EDIT screen will appear.
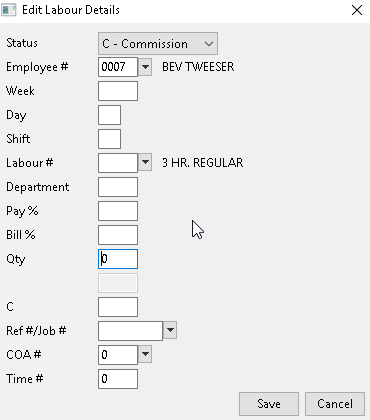
6) Fill in the data fields being displayed. If unsure of a field’s contents, see the Field Definitions section later in this chapter. When done, click on SAVE to save the new labour record. The current screen will disappear. You will be returned to the prior List / View screen. The record you just entered should now be displayed.
Enter additional records or exit this option and return to the main menu.
EDITING EXISTING LABOUR DETAILS
The best method for correcting errors during payroll processing (and the one recommended by KLM) is to reverse the entries made in error and add them in on the next pay run.** But as there is not always time to do this, we do allow you to edit exiting labour detail records.
1) Select PAY #10 Labour Detail File. You are presented with a FILE options screen.
2) Choose the files accessed:
- Job Record History File (default setting). This file is the main “historical” data file and it is NOT recommended that you add records to this file.
- Job Record Input File (used in Pay #19). This is the main Payroll Input File for processing payroll. This file is deleted each time a payroll is processed (see PAY #20).
- Alternate Job Record Input File. This file is used if your payroll input data comes from another system (see Job Costing for details) or if you wish to keep the pay input data records, even after processing a payroll is done.
3) Choose both the COMPANY Number and DATA Year to which you are adding records. Like the labour file, both Company and Year select will determine the actual file being used by the system. It is NOT recommended that you alter (add to) prior year’s data files.
4) Once you have done your file selection, click on LIST RECORDS button to advance to the next screen. If there are already data records in the file you have selected, they will be listed in the order in which they were entered.
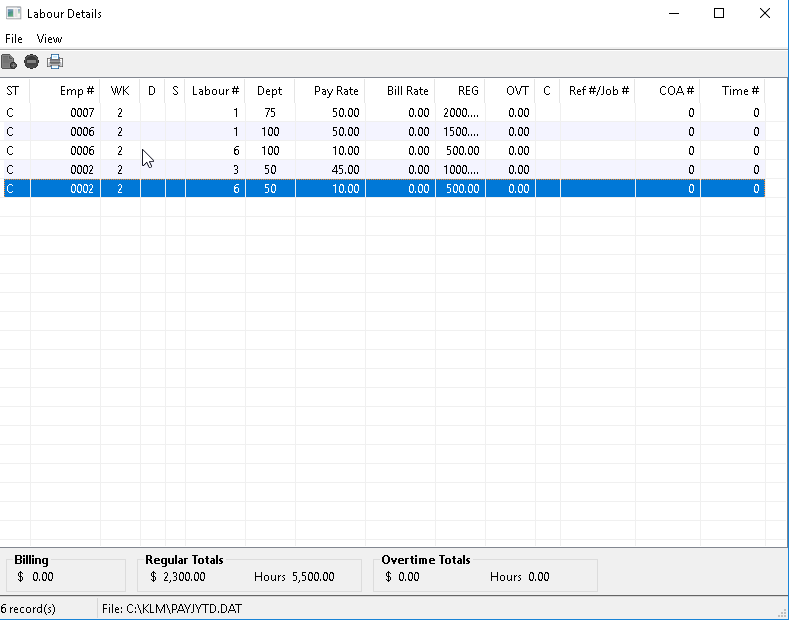
- If the file is empty (no records exist), a blank screen will be displayed.
- You can use the HEADINGS at the top of the listing, to organize the records listed, for ease of finding a specific data record or records.
5) To EDIT an existing data record, locate the record in question then double click on it. An EDIT screen will appear.
6) Make any changes to the data fields displayed. If unsure of a field’s contents, see the Field Definitions section later in this chapter. When done, click on SAVE to save the labour record. The current screen will disappear and the changed record will be displayed.
Edit additional records or exit this option and return to the main menu.
DELETING EXISTING LABOUR DETAILS
The best method for correcting errors during payroll processing (and the one recommended by KLM) is to reverse the entries made in error and add them in on the next pay run. But as there is not always time to do this, we do allow you to delete exiting labour detail records entered in error.
1) Select PAY #10 Labour Detail File. You are presented with a FILE options screen.
2) Choose the files accessed:
- Job Record History File (default setting). This file is the main “historical” data file and it is NOT recommended that you add records to this file.
- Job Record Input File (used in Pay #19). This is the main Payroll Input File for processing payroll. This file is deleted each time a payroll is processed (see PAY #20).
- Alternate Job Record Input File. This file is used if your payroll input data comes from another system (see Job Costing for details) or if you wish to keep the pay input data records, even after processing a payroll is done.
3) Choose both the COMPANY Number and DATA Year to which you are adding records. Like the labour file, both Company and Year select will determine the actual file being used by the system. It is NOT recommended that you alter (add to) prior year’s data files.
4) Once you have done your file selection, click on LIST RECORDS button to advance to the next screen. If there are already data records in the file you have selected, they will be listed in the order in which they were entered.

- If the file is empty (no records exist), a blank screen will be displayed.
- You can use the HEADINGS at the top of the listing, to organize the records listed, for ease of finding a specific data record or records.
- You can view deleted records by clicking on VIEW then selecting DISABLED RECORDS. All D status records will then be included in the records listed. You can also reactivate these records if you so choose.
5) To DELETE an existing data record, locate the record in question then double click on it. An EDIT screen will appear.
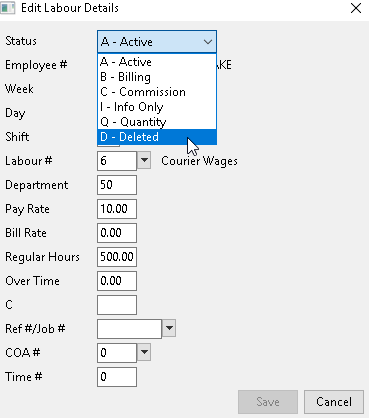
- To flag the record as deleted (or inactive), change the record’s STATUS field to DELETED. The record will still exist in the data file but it will no longer be included in any reports and/or listings. It will not show in PAY #19 or #9. And it will not be processed in PAY #20.
6) When done, click on SAVE to save the labour record. The current screen will disappear and the deleted record will be displayed, so long as you have activated the Disabled Records flag in the List View. Otherwise, the deleted record will no longer appear**.
Delete additional records or exit this option and return to the main menu.
PRINTING EXISTING LABOUR RECORDS
If you wish to print part of all of the data records stored within this file, go to the PAY #10L (labour Distribution Reports) menu option. There you can list data records from any of the Labour Detail files in use.
FIELD DEFINITIONS
FIELD NAME |
DEFINITION |
S (STATUS) |
Is a display only field. The STATUS field is set by the Labour Number selected. The default STATUS will always be A. Remember, A status records will automatically be applied to the Regular and Overtime hours & wages when processing is done. |
WK (WEEK) |
Enter a valid week number (1 to 53) to indicate to which pay week this record is to be assigned. |
D (Day) |
One digit field representing the day of the week. Weeks are recorded as 7 consecutive days (i.e. 1 to 7). |
S (SHIFT) |
One digit field representing the shift an employee worked (on a per day/week basis). The SHIFT information in the Company Master will override the defaults for Pay and Bill Rates. |
LBR# |
Enter a valid Labour Number from LABOUR Number Setup File. Any elements unique to it's setup (i.e. STATUS) will override any field information already entered. |
DEPT# |
Enter a valid Department Number . Defaults can be assigned to a specific Employee or Labour No. |
PAYRATE | This field will contain the pay-rate set up in the Employee Master. You can change the RATE for the current records. The PAY rate is for one hour of work and will be multiplied by the REGHRS to calculate a Regular Wage. Salary Employees; the RATE represents the WEEKLY SALARY divided by the Number of HOURS/WK.
BILLRATE | Optional. Used for customer billing and job costing to indicate the bill rate to be used against any hours defined on this labour line.
REGHRS | Enter the number of hours worked for a week, job etc. for which an employee will be paid the normal rate of pay. The REGHRS field is multiplied by the PAYRATE field to arrive at a regular wage.
OVT HRS | Enter the number of extra (overtime) hours worked for a week, job etc., for which the employee will be paid more than the normal rate of pay. The OVTHRS field is multiplied by the PAYRATE field to arrive at an overtime wage. The PAYRATE can be increased by use of the Overtime Class field.
OVT Indicator | This field indicates what rate of increase will be applied to the pay RATE field when it is multiplied by the OVERTIME HOURS to produce overtime pay. Valid entries are zero for a pay RATE multiplied by 1, blank for a pay RATE multiplied by 1.5, **one **for a pay RATE multiplied by 2, two for a pay RATE multiplied by 2.5, three for a pay RATE multiplied by 3.
REF#/JOB# |Free format for storing a job, reference number or description of what the employee did. This number can be printed on both pay stubs and customer invoices.,
COA# | Optional. Enter a valid Customer Number for the Customer, for whom the employee worked (see also Client Information & Print Client Invoices)
TIME# | Free format for storing miscellaneous information.